Tile Adhesives -the Key to a Strong and Lasting Bond
When it comes to tiling projects, achieving a strong and lasting bond between tiles and the substrate is essential. This is where tile adhesives come into play. Tile adhesives, also known as tile mastics or tile glues, are specially formulated materials that provide the necessary adhesion to bond tiles securely to various surfaces.
In this comprehensive guide, we will explore the world of tile adhesives, discussing their types, applications, and best practices to ensure successful tile installations.
The Importance of Choosing the Right Tile Adhesive
Selecting the appropriate tile adhesive is crucial for the success of your tiling project. The right adhesive will not only bond the tiles effectively but also account for factors such as the type of tiles, substrate, and environmental conditions. Here are a few reasons why choosing the right tile adhesive matters:
Bond Strength: The primary function of tile adhesive is to create a strong bond between the tiles and the substrate. A reliable adhesive will ensure that the tiles remain securely in place, even under heavy foot traffic or in areas prone to moisture.
Durability: A high-quality tile adhesive will provide long-lasting durability, allowing the tiled surface to withstand regular use, temperature changes, and other environmental factors. It minimizes the risk of tiles loosening or cracking over time.
Versatility: Different types of tiles, such as ceramic, porcelain, or natural stone, may have specific requirements in terms of adhesion. The right tile adhesive will cater to the specific needs of your chosen tile material, ensuring a secure bond.
Moisture Resistance: In areas exposed to water, such as bathrooms or kitchens, moisture resistance is crucial to prevent tile damage and mold growth. Certain tile adhesives offer enhanced waterproofing properties, providing an additional layer of protection.
Types of Tile Adhesives
Tile adhesives and Grouts come in various types, each tailored for specific tile materials and application scenarios. Understanding the different types will help you choose the most suitable adhesive for your tiling project. Let's explore the most common types of tile adhesives:
Cement-Based Tile Adhesives: Cement-based adhesives are widely used and suitable for most types of tiles. They consist of a blend of cement, sand, and additives, offering good adhesion and flexibility. Cement-based adhesives are commonly used for ceramic and porcelain tiles in both interior and exterior applications.
Epoxy Tile Adhesives: Epoxy adhesives provide exceptional strength and chemical resistance, making them ideal for challenging environments such as commercial kitchens or industrial settings. They are known for their excellent bonding capabilities with porcelain, natural stone, and glass tiles.
Pre-Mixed Tile Adhesives: Pre-mixed adhesives come ready to use, eliminating the need for additional mixing. They are convenient and time-saving, making them popular for small tiling projects or DIY enthusiasts. However, pre-mixed adhesives may have limitations in terms of bond strength and suitability for certain tile materials.
Modified Thinset Mortar: Modified thinset mortar is a blend of Portland cement, sand, and polymer additives. It offers improved flexibility, adhesion, and water resistance compared to traditional cement-based adhesives. Modified thinset mortar is often used for large-format tiles, natural stone, or areas prone to moisture.
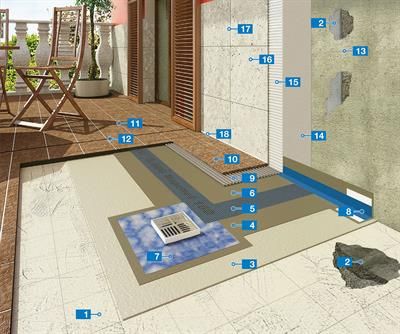
Proper Application Techniques for Tile Adhesives
Achieving a successful tile installation requires more than just choosing the right tile adhesive. Proper application techniques play a crucial role in ensuring a strong and long-lasting bond between the tiles and the substrate. In this section, we will discuss the step-by-step process for applying tile adhesives correctly.
1. Surface Preparation
Before applying the tile adhesive, it is essential to prepare the substrate properly. Follow these steps:
Ensure that the substrate is clean, free from dust, dirt, and any other contaminants. Use a broom, vacuum cleaner, or damp cloth to remove debris.
Repair any cracks, holes, or uneven surfaces on the substrate. Smooth out the surface using suitable patching materials and allow them to dry completely.
In the case of existing tiles, ensure that they are firmly adhered to the substrate. Remove any loose or damaged tiles and repair the underlying surface if necessary.
2. Mixing the Tile Adhesive
Follow the manufacturer's instructions for mixing the tile adhesive. Here are some general guidelines:
Use a clean bucket and add the appropriate amount of water as specified by the manufacturer.
Gradually add the tile adhesive powder while continuously stirring to achieve a smooth and lump-free consistency.
Allow the adhesive to rest for a few minutes, then give it a final mix before application.
3. Applying the Tile Adhesive
The method of applying tile adhesive may vary depending on the type of adhesive and the size of the tiles. Here's a general approach:
Start by using a notched trowel to spread a layer of adhesive onto a small section of the substrate.
Hold the trowel at a 45-degree angle and apply an even layer of adhesive, ensuring full coverage.
Use the notched side of the trowel to create ridges in the adhesive. The size of the notches should correspond to the recommended notch size for the tile being installed.
Work in small sections to prevent the adhesive from drying out before placing the tiles.
If applying adhesive to the back of individual tiles (back-buttering), use the flat side of the trowel to create a thin, even layer of adhesive.
4. Placing the Tiles
Once the adhesive is applied, it's time to place the tiles onto the substrate:
Press each tile firmly into the adhesive, ensuring a proper bond and level surface.
Use tile spacers to maintain consistent grout lines between the tiles.
Periodically check the level of the tiles using a spirit level to ensure a flat and even installation.
Remove any excess adhesive that squeezes out from the edges of the tiles using a damp cloth or sponge.
5. Allowing the Adhesive to Cure
After placing the tiles, allow the adhesive to cure according to the manufacturer's instructions. This typically takes 24 to 48 hours, but can vary depending on factors such as humidity and temperature. Avoid walking on or applying any pressure to the tiles during the curing process.
6. Grouting the Tiles
Once the adhesive is fully cured, it's time to grout the tiles:
Mix the grout according to the manufacturer's instructions, ensuring a smooth and workable consistency.
Apply the grout using a grout float, pressing it into the gaps between the tiles at a 45-degree angle.
Remove any excess grout from the tile surface using a damp sponge or cloth. Rinse the sponge frequently to avoid smearing grout onto the tiles.
Allow the grout to cure as per the manufacturer's instructions, typically 24 to 48 hours.
Once the grout is fully cured, use a dry cloth to buff away any grout haze on the tile surface
Conclusion: Choose Wisely for a Strong Tile Installation
In conclusion, selecting the right tile adhesive and applying it correctly are essential steps in achieving a successful and durable tile installation. The choice of tile adhesive impacts the bond strength, durability, and overall performance of the tiled surface. By considering factors such as tile type, substrate, and environmental conditions, you can make an informed decision and ensure a long-lasting result.
Proper surface preparation, including cleaning and repairing the substrate, sets the foundation for a successful tile installation. Mixing the tile adhesive according to the manufacturer's instructions ensures a consistent and workable consistency, allowing for easy application. Applying the adhesive with a notched trowel, ensuring full coverage and proper ridges, promotes a strong bond between the tiles and the substrate.
Placing the tiles carefully and leveling them ensures an even and aesthetically pleasing installation. Allowing the adhesive to cure fully before grouting is crucial to prevent any movement or displacement of the tiles. Proper grouting techniques, including thorough cleaning and removal of excess grout, contribute to the overall finished look and longevity of the tiled surface.
Appreciate the creator